Even for a low-activity wiki, hosting & rendering many HQ image files takes significant resources and comes with high monthly server costs.
If you're able, please consider contributing to keep the site running to help support this independent, ad-free, fan-run site. Thank you!
Route Zero: Difference between revisions
Correction: BabblingFishes' maps now cover all available versions of the Zero. |
|||
| Line 6: | Line 6: | ||
== Layout == | == Layout == | ||
{{ | Symbolic maps showing the layout and how to navigate the {{Zero}} may be seen below: | ||
<gallery> | |||
File:Zero act2 clockwise.png|Act 2, Clockwise from the Bureau | |||
File:Zero act2 counterclockwise.png|Act 2, Counterclockwise from the Bureau | |||
File:Zero act3 clockwise.png|Act 3, Clockwise from the Bureau | |||
File:Zero act3 counterclockwise.png|Act 3, Counterclockwise from the Bureau | |||
</gallery> | |||
A unfinished map in a different style (showing the position of each symbol along the {{Zero}}'s circle) can be found [https://consolidatedpower.co/~eli/map/ here]. | |||
== Routes == | == Routes == | ||
Revision as of 22:24, 24 January 2020
- For the game, see Kentucky Route Zero.
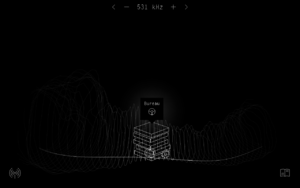
The Zero as viewed from the Bureau in Act III

Route Zero, otherwise known as Highway Zero or simply the Zero, is a mysterious, non-euclidean highway beneath the caves of Kentucky.
The main cast of characters travels on the Zero in Acts II and III, attempting to reach 5 Dogwood Drive.
Layout
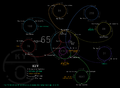
Symbolic maps showing the layout and how to navigate the Zero may be seen below:
-
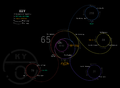 Act 2, Clockwise from the Bureau
 -
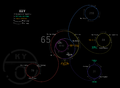 Act 2, Counterclockwise from the Bureau
 -
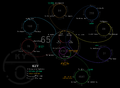 Act 3, Clockwise from the Bureau
 -
 Act 3, Counterclockwise from the Bureau


A unfinished map in a different style (showing the position of each symbol along the Zero's circle) can be found here.
Routes
- Route 31 (via the feather)
- Route 65 (main route)
- Route 70 (via the TV)
- Route 84 (via the sandwich)
- Route 88 (via the scarecrow)
- Route 160 (via the anchor)
- Route 259 (via the bottle)
- Route 4641 (via the cathode ray)
- Route 8192 (via the crystal)
Gallery
|
This section needs expansion. |
Quotes
- JOSEPH: Listen, you and Blue would've been driving up and down sixty-five all night. Dogwood Drive is on the other side of ... well, to get there you've got to take the Zero.
- LULA: Just navigating, apropos of nothing? The Zero doesn't work like other roads. You can't just drive and expect to find yourself somewhere. You must be more deliberate than when driving on surface roads. And, in a way, much less deliberate ...
- WILL: This old river-rat steers clear of weird highways.
- LULA: My most vivid memory is a parade of images, like a waking dream or a slide lecture I'll never understand: A television, a scarecrow, a crystal, a feather, a sandwich ... a CRT monitor, a bottle ... an anchor ...
- DONALD: Ah, you came from the road. The Zero. No, you should stay off that road. Not safe. Bizarre topology. You'll never get anywhere. It just brings you right back here.
- SHANNON: I'm starting to wonder if the Zero could be my 'third place' now ...